Fully Customizable. API Integration.
Email blacklist filtering added to Hepsia Control Panel
 We have recently upgraded the Email Manager’s protection. Our advanced email blacklist filtering technology relies on the latest tested mail server verification methods. We use only reputable blacklist and greylist database sources.
Email security is one of the top priorities for everyone today. The popular spam messages which contain attachments one should not download are no longer the only thing you need to avoid. When you open an email from an unknown user even by accident, oftentimes you will land in a long spam list. Hidden malware download is also common with these messages.
A customer can activate / deactivate the mail blacklist filtering from the Hepsia Web Hosting Control Panel.
How does email blacklist filtering work?
The Domain Name System Blacklist (DNSBL for short) or DNS blacklist is an exhaustive anti-spam database. It is regularly updated. It contains vast lists of domain names which are blacklisted due to reports for spreading spam of any kind. Once blacklisted, all the messages sent from their mail servers (tracked by IP) are blocked.
We use DNSBL, which is better than standard anti-spam protection, as all malicious email messages are blocked before their delivery to the recipient’s mailbox.
Like mentioned above, we have access to a vast IP database which is updated on an hourly basis. Thanks to this info, we can instantly verify whether a specific email message comes from a blacklisted source. In addition to the IP addresses blacklist, there’s also a large IP greylist and an exhaustive IP extra spam list that we use. When a customer receives a message, we match the IP of its sender against the IP addresses in all three databases. In case of a match, the message will not go to the mailbox. What’s more, the network connection from its sender’s blacklisted address will be blocked as well. As a result, you can forget about terms like spam and malicious software when using our services.
How to enable/disable the email blacklist filtering option?
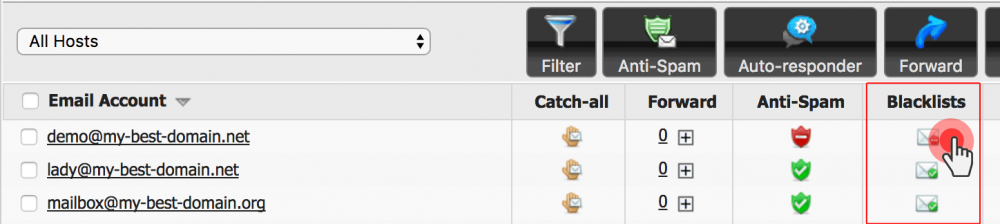
It is simple! You just need to log in to your Web Hosting Control Panel. Then, go to the Email Manager section where you will see the Blacklist column. For your convenience, you can individually enable / disable blacklist filtering for each of your mailboxes.
The blacklist filtering is active for all accounts by default. You can disable it for each of your emails with a single click. Turn it off by clicking on the green Blacklist icon, if you’re certain that the mailbox you deactivate it for will receive email messages only from trusted sources.
You can re-enable the blacklist filtering later by clicking on the red Blacklist icon:
Thanks to the recent upgrades to the blacklist mail filtering system, both you and your clients can take advantage of a truly flawless anti-spam protection.
Leave a Reply